I've been itching to create something with the "I Can Do Hard Things" motto for a long time now. I have always been drawn to those words because ah, such truth in them!
Well, for some reason a creative rush hit me on Monday evening, yes.. Monday night, what was up with that?. D was playing Super Mario with Aspen, and Savannah & Addi came down to the craft room with me where they ended up painting.
I found this beauty of a vintage frame at a thrift store a few months back, $7 little find. (I know, right?) I have been undecided what I wanted to do with it, but just knew that beautiful little sucker would go in my craft room.
Then it happened: the angels began to sing & it was clear what I was to do. Okay, scratch the Angels singing part, but maybe... maybe they did sing. Pfft, you don't know. With fabric that stinkin' cute, how could they not? See? My point exactly. Just roll with it, people..just roll with it.
I know, I know... Girl, what is UP with that horrible picture quality?. Dude, totally not my fault. I can't find my battery charger for my camera anywhere. I have looked at 3 stores for a replacement, no go! So, for the last several weeks I've been relying on my phone. Yeah, I know, it's rough around here. Once I get the camera going, I assure you I will take better shots. But geesh, can't ya cut a Sister some slack? Goodness Gracious!
Ok, super easy project!
- Stalk your fave. thrift store for an awesome frame. (that's the fun part!)
- Remove the ugly picture inside that daaaah-ling frame.
- Slap some Annie Sloan Chalk Paint (Paris Gray) on the frame.
- Wrap frame insert with fabric, hot glue down.
- Bust out some fatty letter stickers
- Call it a day. But first, take one more look and smile because ah... the truth of those words are powerful!! Why? BECAUSE WE CAN DO HARD THINGS!! WE CAN! Never, ever forget that!
Peace Out, Homies!
Showing posts with label Crafts. Show all posts
Sunday, November 4, 2012
Monday, June 18, 2012
Tie-Dye Fun...
Last summer, one of our projects was tie-dye shirts. The girls had a blast making them, but oh was it ever so messy! Well this year, we just found out that the girls camp colors for their team at church camp is "tie-dye", and though camp isn't until another 3.5 weeks away, we thought we would get a head-start. Since we've been on the go non-stop, we thought this would be a perfect project to tackle today since we decided to spend the day at home.
Last year, we ended up spending about $75 in supplies, a little excessive and a lot messy, though fun! But this year, we did things a little bit different. We found "Fabric Paint" in spray bottles, perfect for tie-dying, and at only $19.99. We snatched a couple of $3.99 tee-shirts from Micheals, and this project we were all in under $35.00. Pfft, it was looking better already! :)

I have to say that doing the shirts using this method was so much easier, and so less messy. The girls had a lot of fun, and the clean-up was very minimal.. always a plus! They simply twisted the shirts in the middle, squirted on some fabric paint, untwisted, then twisted other sections of the shirt following the same process. Easy-peasy!


..and, here are the final shirts.


They each did 2, and there's still enough fabric paint to bust out a couple more...now we just need more Tee shirts!.
I think Savannah was happy with hers and will sport it to camp, but the other 2 are wanting to make some more and called these their "practice shirts", so...make more, we shall.
Super easy project and sure did keep them entertained! :) Pfft, I'll take it...
Last year, we ended up spending about $75 in supplies, a little excessive and a lot messy, though fun! But this year, we did things a little bit different. We found "Fabric Paint" in spray bottles, perfect for tie-dying, and at only $19.99. We snatched a couple of $3.99 tee-shirts from Micheals, and this project we were all in under $35.00. Pfft, it was looking better already! :)
I have to say that doing the shirts using this method was so much easier, and so less messy. The girls had a lot of fun, and the clean-up was very minimal.. always a plus! They simply twisted the shirts in the middle, squirted on some fabric paint, untwisted, then twisted other sections of the shirt following the same process. Easy-peasy!
..and, here are the final shirts.
They each did 2, and there's still enough fabric paint to bust out a couple more...now we just need more Tee shirts!.
I think Savannah was happy with hers and will sport it to camp, but the other 2 are wanting to make some more and called these their "practice shirts", so...make more, we shall.
Super easy project and sure did keep them entertained! :) Pfft, I'll take it...
Sunday, June 3, 2012
For the Love of Spray Paint...
My husband must have some kind of inside joke with himself about my obsession with spray paint, I can see it all over his face. Everytime I bust out the spray paint & walk outside he always has this smirk on his face and then pipes up, "Spray painting, again?" Pfft, you know it, buddy!
Today was no exception. Only this time, while I was spray painting, homie (that would be my husband) asked to use one of my spray paint cans so he could spray the yard where the pool is going to go, to get a better visual of it. This was hard for me. It made me realize that I must have some sick attachment disorder with spray paint, because sister didn't want him to waste it. First, he picked up my favorite blue color...."No, not that one!" He kind of rolled his eyes, went back inside and then came back out with my green. "Really? That one? Can you find one that isn't colorful, maybe?" His response was something on the lines of, "Seriously? Can you not just go buy another can?"... "Yeah, but do I really want to go to Lowe's tomorrow if I don't have to?"... so, we settled. He used the white. Compromise is a beautiful thing, don't ya think?
I've had this little white bench in my garage for a good 3 years, at least. I found this little sucker at Goodwill for $4.00, and I knew that it had potential. When I bought it, I was feeling inspired and was planning on sewing Courtney a new "boutique-style" bedding set that I saw online that I just had to make! I went out & purchased all the fabric, but.. got way over my head and ended up bagging the idea. This bench was going to be re-painted, and I was going to use the fabric, which would have matched the rest of her bedroom, on the seating area. So, since the idea was just that... an idea... this little bench has been waiting on me ever since. Well, today was the day!
Here she was before....
and, here she is AFTER.
I distressed her by slopping brown acrylic paint all over her...
then, I spray painted her with ivory paint, waited for it to dry... then used sand paper so the finish would look like this:
I was planning on covering the cushion with burlap (another obsession as of late), and then keeping up with my vintage-y theme in my craft room by adding ivory lace around the bottom. But, I was feeling a little more spunky today and decided to embrace PINK pom-poms instead. :) So so cute!
I transformed these drab candlesticks from Goodwill ($2/ea)....
into these colorful little cuties:
A few days I started on a few other little projects (coming soon).. and this was one of them: I changed this...
into this....
and, I'm in the process of changing this little beauty, too:
We have lots of other "painting projects" in the works over here, you have no idea! So, stay tuned! :) I'm having a blast with it & hope to have a few more things to share with you over the next few days.
I also added a few new things to our family room this past week which I will be sharing with you as well. It's amazing what a few little additions can do to a room. So, be sure to check back soon, ok?
Labels:
Before/After Projects,
Crafts,
Refunked Projects,
Thrifting
Wednesday, May 30, 2012
My Craft Studio
As I mentioned a few days ago, I recently locked myself in my craft room and made sure that I wasn't leaving until I finally figured out where everything in that room was going to go. We moved into our new home back in October and this room has only been simi put together. I've moved things around a million times, but still never finding the best placement for everything. Then, I just kind of kept it the way that I left it, which worked, but it just wasn't visually pleasing. picky, picky, picky!
After I scored the yellow hutch off of Craiglist, the hutch basically just sat in the room, blocking my shelving unit. It stayed that way for about 3wks. Finally, motivation found me and sister was able to stay focused long enough to see it thru. Can I get an Amen? :) I moved things around that day in every way possible. I spent 4hrs. on that room until it finally clicked! I thought I had the right placement. It felt right, but it appeared so cluttered and the room so small, which it's not. Then finally it hit me. This crazy idea came in my head, I moved everything one last time and voila! I swear I heard angels singing. It only took months & months, but by golly.... it's done. Well, almost done. I still have to hang a few things and do a better job of organizing the things in my shelving unit, add things here & there, but by golly... we're much closer than we were before, and that's called progress, people... beautiful-beautiful progress. :)
I'm thinking curtains similar to these would look amazing in there....
Of course though, I will be attempting to make them verses buying them. Have you seen the price tag on these suckers? So, this would be a great summer project because man oh man, I'm sure I'll need (a lot) of time & practice to attempt these bad boys. I'm excited though, I mean, they can't be that hard, um.. can they? Shhh...
Okay, moving on.
I'm also eyeing this beauty of a rug that would look oh so perfect. It fits my theme and it just makes my heart go pitter patter. It's on my "dreamy-things-to-buy" list. It's more pricey than I could ever justify buying, because you know sister don't play like that, but this just may be the one purchase that I have to splurge on. If anyone see's a knock-off of this, hit this chick UP!
Now, onto the room. It's still messy, and not everything is in its place, but... work with me, people! :) Here we go....
This is the left side of the room once you walk through the door from the basement family room.
This is the little table that I gave new life to. :)
Here's a view of the same side of the room standing from the back.
Closeup of hutch... ah, beautiful little mini dressform canvas, oh, how I love you so.
This is the view from the door going outside, next to the chairs in picture #1.
This one came out dark, but this is the view looking in from the hallway door.
I'm obsessed with dressforms, but when I found this one.... ah, stole my heart right away.
Portion of my messy art table. I really like the feel of a boutique store with all my supplies, that's why I have 2 hutches in this room. I store all my supplies in baskets or easily moveable containers so that when I'm working on a project, I can just grab the basket of things that I need, and it's easy pick-up, too. Here's a shot of the table during a project :)
This is my inspiration board which will be mounted to the wall, centered over my table. Just gotta get hubby to hang that puppy. :)
... more to come. I'll share all the little details, and all the little things that I didn't take pictures of, next time. So... stay tuned. This room is a work in progress, but it's my happy place & I'm excited I finally got to share it with you.
Labels:
Crafts,
Home Decorating,
Inspiration,
The Nest
Tuesday, May 29, 2012
DIY Melted Crayon Canvas
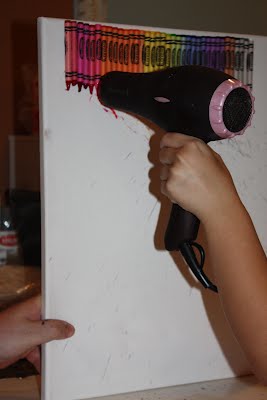
Aspen has been wanting to make a melted crayon canvas, so we busted out the blank canvas, a box of crayons, & the blow dryer over the weekend, and went to town! This was a really easy project, but I will say that it was a little messy. A new yellow golf shirt that I bought my husband last week? Yeah, ruined from the messy melted crayon splatters, but hey… it’s just a shirt.. I think the husband was having as much fun as the daughter, because she literally had to beg for the blow dryer back at one time, quite funny actually.
Okay, here’s what you’ll need:
- A blank canvas.
**If you have a Big Lots near you, they have cheap canvas’ for $3 and $5. Big ones, too. It’s the only place I buy mine. Sister loves a good deal.
- 2-3 Boxes of crayons.
- Hot Glue Gun
- Blow Dryer
- A Sheet or garbage bag to prevent a mess
Hot glue the crayons onto the canvas. We only bought 1 pack of crayons, and we quickly learned we should have bought 2 or 3. But, we worked with what we had.

You then turn your blow dryer on, facing downward, and the wax from the crayons will start to melt, dripping in a downward motion. Aspen pointed the blow dryer sideways, which caused the melted wax to be blown on Dad’s shirt… splitter splatter, splitter splatter…. So, just from expierence, keep that bad boy pointed downward.


That’s all there is to it. Super easy. I’m sure we’ll be doing this one again, and def. using 2 or 3 boxes of crayons so the fit all the way across next time. :)
Okay, here’s what you’ll need:
- A blank canvas.
**If you have a Big Lots near you, they have cheap canvas’ for $3 and $5. Big ones, too. It’s the only place I buy mine. Sister loves a good deal.
- 2-3 Boxes of crayons.
- Hot Glue Gun
- Blow Dryer
- A Sheet or garbage bag to prevent a mess
Hot glue the crayons onto the canvas. We only bought 1 pack of crayons, and we quickly learned we should have bought 2 or 3. But, we worked with what we had.
You then turn your blow dryer on, facing downward, and the wax from the crayons will start to melt, dripping in a downward motion. Aspen pointed the blow dryer sideways, which caused the melted wax to be blown on Dad’s shirt… splitter splatter, splitter splatter…. So, just from expierence, keep that bad boy pointed downward.
That’s all there is to it. Super easy. I’m sure we’ll be doing this one again, and def. using 2 or 3 boxes of crayons so the fit all the way across next time. :)
Subscribe to:
Posts (Atom)